To build a 64-bit operating system from scratch, initially we made an x86 compatible operating system which is multi-boot 2 compliant. The operating system was primarily written in the c programming language with some assembly for the hardware specific code.
Qemu was used to emulate operating system instead of going through the hassle of installing the OS oncomputer or loading it on a USB. We also installed nasm grub and the specific (gcc-cross-x86_64-elf) gcccross compiler. To simplify the building process, we used Docker. Docker allowed us to create a reproducible build environment.
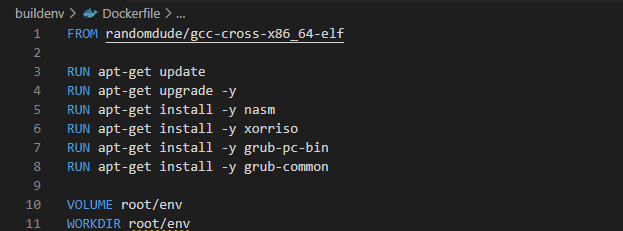
Creating docker image:
First, we created a docker image, which is like a snapshot of a linux machine with any extra software and files installed onto it. To create the docker image, we created a folder build environment and in there we created a docker file which described all the steps we need to create our build environment image. We based our image on the pre-made image (gcc-cross-x86_64-elf ) which holds all the gcc compilation tools we needed. We installed a few more packages like nasm, to compile our assembly code, also the grub packages (grub-pc-bin and grub-common), for building our final .iso file, also xorriso for the grub packages to work.
We hooked up a volume to our development environment so that we have access to all our files and then we alsoset this folder as the starting folder so we can now open up our terminal and build our image.
Integrating the entry point to our operating system with multi-boot 2:
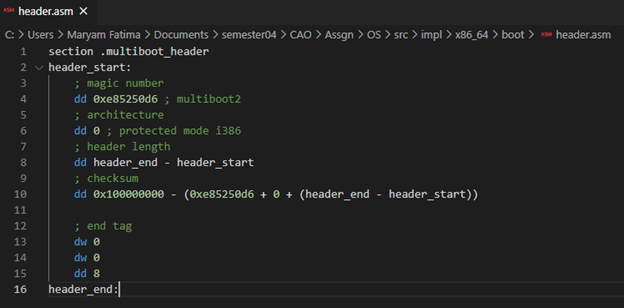
To integrate the entry point to our operating system with multi-boot 2 we created a header.asm file. The magic data in this file is to be included in OS binary so that boot loader (the first thing to start on a computer) understands that we have an OS that can be run on computer.
The section was named multiboot_header. Header end and start tag were used to mark the start and end of thesection. Next the magic number was added that multi-boot 2 loader will look for, which was then followed bythe architecture information. The next piece of data was header length calculated using header start and endtags. Finally, the check sum followed by an end tag to say that we do not have any more data.
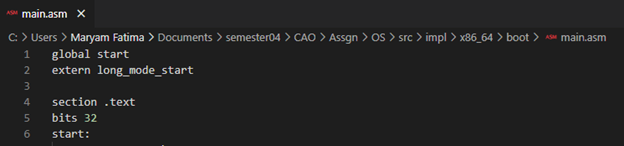
The entry point to our operating system is main.asm file. We created a global start label for our entry point so that we can access it when we are linking.
Next, we created the text section and set the bits to 32.
Setting up stack:
We then set up a stack which is crucial to allow us to link in with c code. We created two labels to refer to the top and bottom of the stack and reserved 16 KB memory using resb command. Stack was included to bss section which contains statically allocated variables. This memory is reserved when the bootloader loads the kernel. Since the esp register points to top of stack and currently, stack is empty we stored the address of stack_top label in this register.
For 64-bit kernel mode we need to use the long mode, before which we need to check whether CPU supports longmode.
Check for long mode support:
To know whether long mode is supported, we need to check 2 things:
- Have we been loaded by multi-boot 2 boot loader?
- Does CPU support cpu-id?
1. Have we been loaded by multi-boot 2 boot loader?
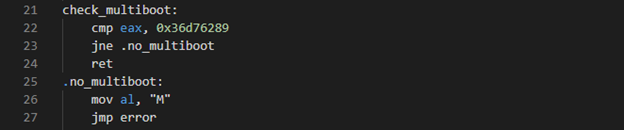
We created the subroutine check multi boot for this purpose. Any bootloader stores the magic value in eax register. If the content of eax is not equal on comparison we jump to no_multiboot label, where we move the letter ‘M’ (multi-boot) and jump to label error to print “ERR: M” on screen and then halt the CPU. Else check for cpu-id.
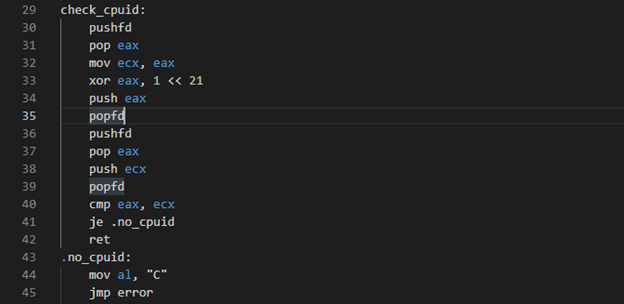
2. Does CPU support cpu-id?
We created the subroutine check cpu id for this purpose. In this sub routine, we attempt to flip the cpu id. If CPU supports cpu id, then id bit of the flags register can be flipped else the attempt of flipping fails. This was achieved by copying eax original content to ecx and then xor-ing the bit 21 of eax which is the id bit. The registers were pushed and again popped from stack then the values of eax and ecx were compared, if they match, we then know that the cpu did not allow us to flip that bit and that cpu id is not available so we jump will to no_cpuid label (where we will move ‘C’ to al register and jump to error code) otherwise we can just return from the subroutine.
Now to check for long mode support we need to check If:
- cpu id supports extended processor information.
- CPU supports extended processor information.
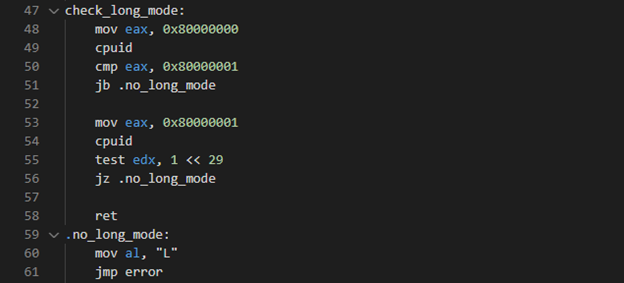
Firstly, we check if cpu id supports extended processor info. We move value 0x80000000 to eax and run cpuid command if cpuid returns a bigger value in eax then cpu id supports extended processor info, else it does not and in turn it also does not support long mode so we will jump to no_longmode label.
If cpu id supports extended processor info, we will check if CPU supports extended processor info. For thiswe compare eax with 0x80000001. We then run the cpuid instruction again this time cpuid will store a valueinto the edx register and if the lm bit is set then long mode is available. We can test if the ln bit is setwhich is at bit 29. If it is not set, we once again jump to our no long mode label. If it is set, we canreturn successfully from the function. This time the error code is L which stands for long mode and we thenjump to our error instructions.
Finally, the check for long mode support ends.
Entering the long mode:
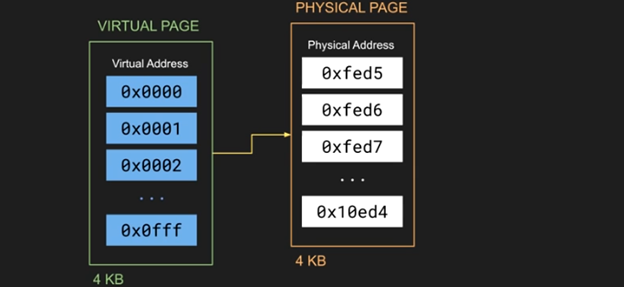
We need to implement virtual memory in order to enter 64-bit long mode through paging. Paging allows us to map virtual addresses to physical addresses.
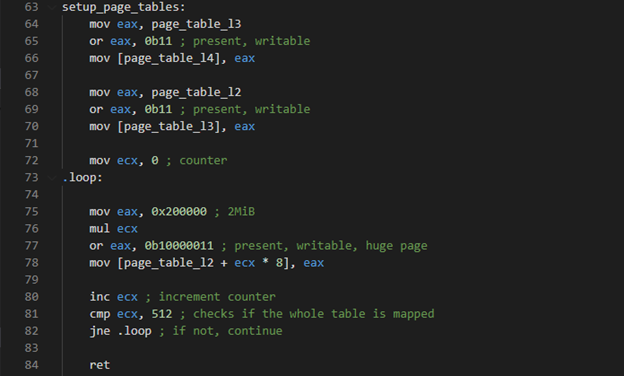
We created two subroutines. First is to set up the page tables and then in second, we ask the cpu to enable paging.
We have 4 types of page tables. Each table can hold 512 entries, so each virtual address takes up 48 bits outof the 64 bits available the other bits are unused. 9 bits are used as an index into each level page table.The final bits of the virtual address are used as an offset in physical page.
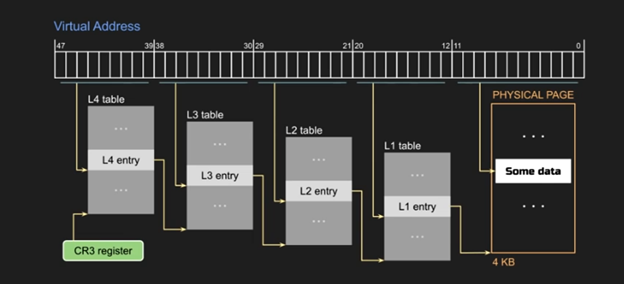
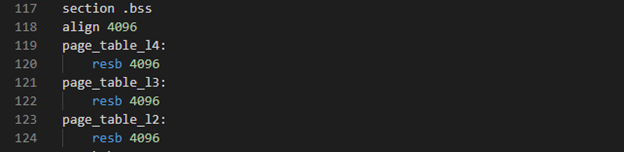
In bss section, we reserve memory for our page tables. Each table is four KB, and we align all the tables to four kilobytes. Then we created our root page table i.e. level four page table of 4096 bytes. We also created a single level three page table and a one level two page table.
Setting up page tables:
We identity mapped the first gigabyte of pages and added one entry to the level 4 table which will point to the level 3 table. We also enabled the present and writeable flags which are located at the first and second bit. We take this address which has some added flags and put it in as the first entry into the level 4 table and do the same and have one entry in the level 3 table and this will point to the level 2 table.
we then enable the huge page flag on any entry in the level 2 table, this allows us to point directly tophysical memory and allocate a huge page that is two megabytes in size. Spare nine bits in the virtualaddress will be used on top of the remaining bits as an offset into huge page.
We then filled up all 512 entries of the level 2 table and each entry is 2 megabytes each and that totals to1 gigabyte that we identity mapped by using for loop.
Enable paging:
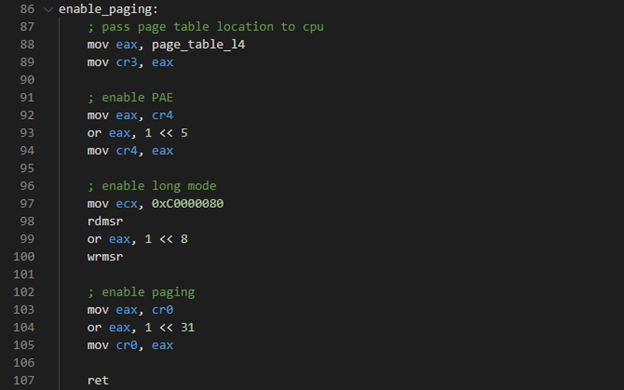
CPU looks for page table location in cr3 register. So, we moved level 4 table address to eax and then copy it to cr3 register. We then enable Physical Address Extension (PAE), by enabling PAE flag in cr4 registers by copying it to eax and then saving it back. We then enable long mode by moving the magic value in ecx register and then running the read model specific register (rmsr) instruction. As a result, a value is loaded in eax register, we then enable the long mode flag which is bit 8 of eax registers content. Finally, we write back to efer register by running the write model specific register (wmsr) instruction.We can enable paging by enabling the bit 31 of the cr0 register.
We have successfully entered long mode.
Entering 64-bit mode:
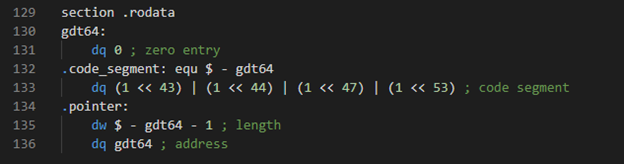
We now enter the 64-bit mode by creating the global descriptor table. We created a read only data section and we begin with 0 entry and create a code segment. In code segment we enabled the executable flag, the descriptor type, the present flag and 64-bit flag. We also created a pointer to the global descriptor table which also holds two bytes of the length of the table.
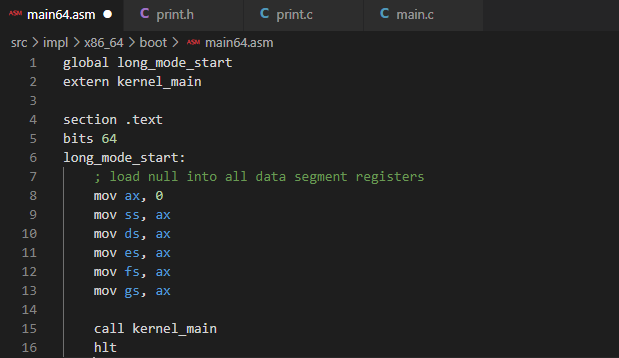
we can now load the global descriptor table, so we need to give it the pointer and then we need to load our code segment into the code selector. Using a jump instruction, we specify our code segment offset and then in the same instruction the cpu jumps to some 64-bit assembly code that we wrote in main64.asm file in a label named long mode start.

So just like main.asm we created a code segment in main64.am file. The difference is that we set the bits to 64. We also created a global long mode start label and then we loaded 0 into a bunch of data segment registers.
We then created a main.c file in which we created a function called kernel main. In this function we called the print clear, a function to clear screen, a print set color function, to change the foreground and the background color, and the print string function to print string on screen.
Printing Files:
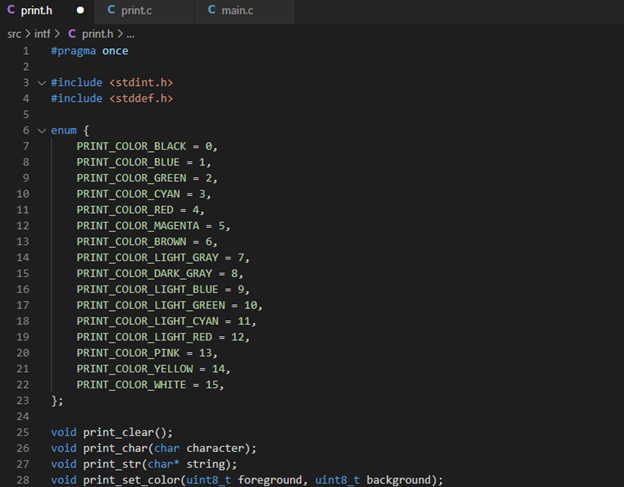
In print.h file, on top we included stdint.h and stddef.h files and then we declared the functions we will be defining in print.c file and finally created enum for colors.
We start coding our print.c file by including print.h file on top.
The way printing works is that video memory holds an array of characters where each character is representedwith the ascii character followed by an 8-bit color code. We created a buffer variable to refer to the videomemory which begins at 0xb8000 and we cast this to our custom character type.
We are keeping the track of the row and column number which are initially set to 0. We are also keeping trackof current color. The first 4 bits represent the foreground color while the next 4 bits represent backgroundcolor.
We set the total number of columns to 80 and total rows to 25.
Print clear function loops through all the rows starting at zero and for each row calls a function calledclear row. Clear row function takes the index of the row and prints an empty space character. For each columnin the row, we print the empty character by looping up to the number of columns and updating the appropriatecharacter in the buffer. We calculate the index by current column plus the total number of columns multipliedby the current row.
Similarly, the rest of print functions were implemented using the character struct and row and columnvariables and sometimes include call to another function which we created.
Setting up linker file:
To set up our linker and grub configurations, we created a linker file and a grub configuration file. The linker file describes how we have to link our operating system together. We start by defining the entry point to our system i.e. start as mentioned in main.asm file. Next, we set the current address equal to 1MB and defined the individual sections of our binary like the boot and text sections.
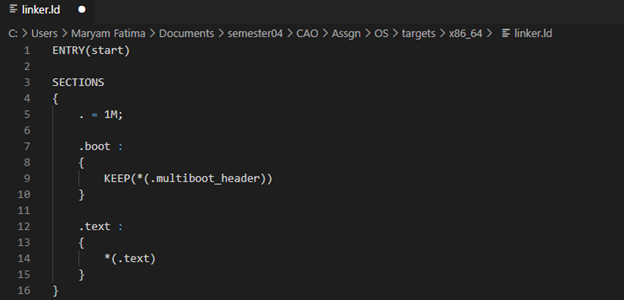
Meaning that that we will start one megabyte in then we will have our multi-boot header and finally will have all our CPU instructions.
Setting up grub configuration:
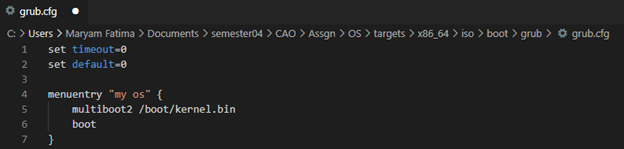
Grub will create an iso file out of our operating system kernel binary. An iso file is a common format for holding an operating system. The grub configuration file defines a menu entry where we specify the name of our OS inside the boot menu. Our binary is multi-boot 2 and we locate this at boot/kernel.bin
We also created a git ignore file as we are using git and added boot/kernel.bin to it.

Make file:
Make is a handy tool for organizing all the build commands and making sure that only files that have been modified get rebuilt and hence is extremely fast.
In make file we created a variable to hold all our x86 64 assembly source files (all files ending with .asm)and a variable to hold all our x86 64 assembly object files. Then we will compile each individual source fileto an object file, we did this by defining the commands to build one of our object files, so thatrecompilation only takes place when one of the source files have changed. Before building object files wemake sure that the directory exists, to hold our compiled file. Finally, we use nasm to compile. We usedreverse path substitution to go from our object file back to our assembly file.
We also created variables for c and kernel source and object files, then we created a variable to hold allour x86_64 object files by concatenating the two arrays of c object files and the assembly object files.
We then defined the way to build our c object files by using path substitution and finally used gcc to buildc files. We did a path substitution so that we will be able to determine our input source files from ouroutput object files. We then did the same for kernel object files.
We created a custom PHONY command called build-x86_64 and it only runs if any of the object files havechanged which in turn only run if any of the source files have changed. We then run the linker command tolink all our object files and our output will be kernel.bin. Lastly, using the grub make rescue command wepass in architecture directory for the command to build the .iso file.
Setup
Build an image for our build-environment:
| docker build buildenv -t myos-buildenv
Build
Enter build environment:
| Windows (CMD): docker run --rm -it -v "%cd%":/root/env myos-buildenv
Build for x86 (other architectures may come in the future):
| make build-x86_64
To leave the build environment, enter exit.
Emulate
You can emulate your operating system using Qemu: (Don't forget to add qemu to your path!)
| qemu-system-x86_64 -cdrom dist/x86_64/kernel.iso